거의 하루 종일 이것만 붙잡고 늘어졌다.
나의 고생이 누군가에게 해결책이 되길 바라며 포스팅을 남긴다.
뭔가 종말의 멘트 같잖아..?
Electron 공식 문서에서는 Web API를 이용해서 SerialPort 모듈에 접근한다고 했는데,
따라 해 보니 너무 복잡하고 아두이노 한정 예제라 그런지 되지도 않았다.
그래서 Node.js의 SerialPort 라이브러리로 진행했다.
About SerialPort | Node SerialPort
Quick Answers to Important Questions
serialport.io
(참고로 윈도우 버전이다)
아~~~주 친절하게 install 할 수 있는 방법이 설명되어 있지만
절대 사용하지 않겠다......
왜냐하면 기존 프로젝트에 추가하는 방식으로 진행했을 때,
복잡한 크롬의 보안 정책과 여러 버전과의 충돌로 계속해서 에러가 나는 걸 확인했다.
그래서 electron-serialport git에서 다운받고 그걸 수정하는 식으로 진행하겠다.
https://github.com/serialport/electron-serialport
GitHub - serialport/electron-serialport: An example of how to use serialport in an electron app
An example of how to use serialport in an electron app - GitHub - serialport/electron-serialport: An example of how to use serialport in an electron app
github.com
#순서대로 진행하면 된다.
# Clone this repository
git clone https://github.com/serialport/electron-serialport.git
# Go into the repository
cd electron-serialport
# Install dependencies
npm install
# Run the app
npm start
그럼 이런 오류가 나왔다.

node-abi를 업데이트하란다.
npm install node-abi잘 설치가 되고 나서 npm start를 해보면?

미리 꽂아둔 USB-serial도 잘 잡히고 2초에 한 번씩 갱신 중이다.
별문제 없이 Serial을 이용할 수 있으니 이제 내 맘대로 바꿔주겠다.
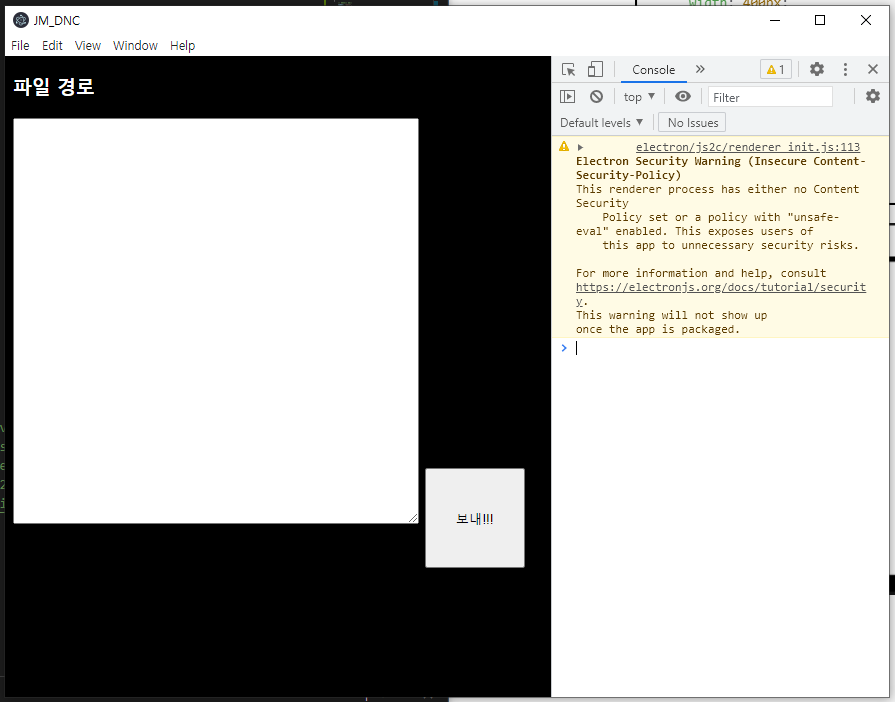
우선 html에서 화면 구성을 바꿔주자
Serial의 기본인 textbox와 sendBtn을 만들어주겠다. 추가로 파일 경로를 표시할 것까지!
<!-- index.html -->
<!DOCTYPE html>
<html>
<head>
<meta charset="UTF-8">
<title>Hello World!!</title>
<link rel="stylesheet" href="style.css">
</head>
<body>
<h3 id="file-path">파일 경로</h3>
<textarea id="code"></textarea>
<button id="sendBtn">보내!!!</button>
</body>
<script src="./renderer.js"></script>
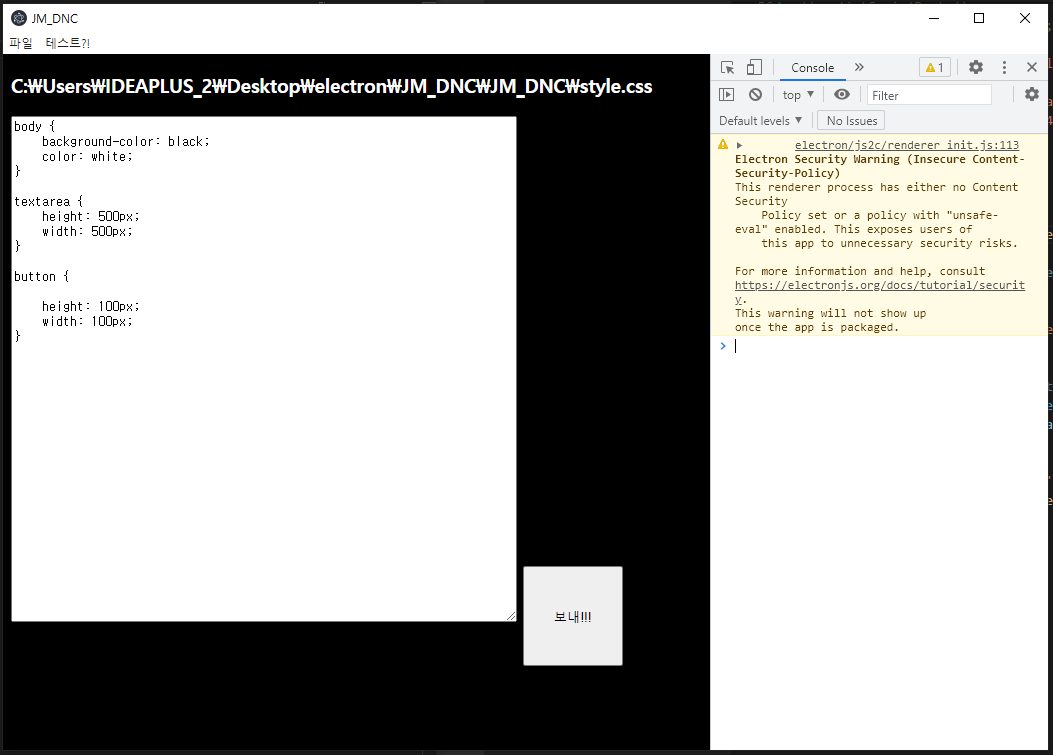
</html>화면은 만들어졌는데 보기 싫으니 얼른 css 가서 바꿔주겠다.
/* style.css */
body {
    background-color: black;
    color: white;
}

textarea {
    height: 400px;
    width: 400px;
}

button {

    height: 100px;
    width: 100px;
}
음 이름도 바꾸고 UI도 멋있어졌다.
어차피 최소 기능만 확인하면 되니깐 대충...
그럼 이제 main.js에서 file을 읽어오고 저장하고 등등 여러 가지를 해야 한다.
자세한 설명은 어려우니 아래 코드를 참조하길... 주석도 열심히 달아보겠다.

// main.js
const electron = require('electron')
const app = electron.app
const BrowserWindow = electron.BrowserWindow
const Menu = electron.Menu
const dialog = electron.dialog
// 위와 아래의 차이는 잘 모르겠다...
const fs = require('fs')
const path = require('path')
const url = require('url')

// 전역변수로 지정해줘야 바깥에서 mainWindow를 건들 수 있다.
let mainWindow

function createWindow() {
    mainWindow = new BrowserWindow({
        width: 900,
        height: 700,
        webPreferences: {
            // 아래 두 개는 renderer.js에서 mainWindow를 참조 할 수 있는지를 나타내는 것 같다.
            nodeIntegration: true,
            contextIsolation: false, // workaround to allow use with Electron 12+
            preload: path.join(__dirname, 'preload.js')
        }
    })

    mainWindow.loadURL(url.format({
        pathname: path.join(__dirname, 'index.html'),
        protocol: 'file:',
        slashes: true
    }))

    mainWindow.webContents.openDevTools()
    mainWindow.on('closed', function() {
        mainWindow = null
    })
}

// 메뉴 만들기
const template = [
    {
        // 계단식 형태
        label: '파일',
        submenu: [
            {
                label: '파일 열기',
                click: async () => {
                    // dialog를 불러오면 인자로 canceled, filePaths를 준다. filePaths만 필요하므로
                    const { filePaths } = await dialog.showOpenDialog({
                        properties: ["openFile"],
                    });
                    const file = filePaths[0];
                    // utf-8로 인코딩하며 파일을 읽어들이고, contents라는 인자에 저장한다.
                    const contents = fs.readFileSync(file,'utf-8');
                    // renderer에서 ipcRenderer로 받을 것들.
                    mainWindow.webContents.send('fileOpened', {
                        contents,
                        filePath: file,
                    });
                    // 처음 로드 시 파일 저장을 enabled = false하기 위해서
                    saveFileItem = menu.getMenuItemById('save-file');
                    saveFileItem.enabled = true;
                },
            },

            {
                id: 'save-file',
                enabled: false,
                label: '파일 저장',
                click: async () => {
                    // renderer에서 ipcRenderer로 받을 것.
                    mainWindow.webContents.send('saveFile');
                },
            },
        ],
    },

    {
        label: '테스트?!',
    },
];
// 이걸 추가해줘야 지정한 메뉴가 사용된다.
const menu = Menu.buildFromTemplate(template);
Menu.setApplicationMenu(menu);

// This is required to be set to false beginning in Electron v9 otherwise
// the SerialPort module can not be loaded in Renderer processes like we are doing
// in this example. The linked Github issues says this will be deprecated starting in v10,
// however it appears to still be changed and working in v11.2.0
// Relevant discussion: https://github.com/electron/electron/issues/18397
// 이 녀석 때문에 힘들었다.
app.allowRendererProcessReuse=false

app.on('ready', createWindow)

app.on('window-all-closed', function() {
    app.quit()
})

app.on('activate', function() {
    if (mainWindow === null) {
        createWindow()
    }
})
잘 작동하니 이제 버튼이 눌리거나 html의 요소를 바꿔줄 renderer.js를 건드려보겠다.
// renderer.js
const {ipcRenderer} = require('electron');
const fs = require('fs');
const serialport = require('serialport');
const port = new serialport('COM4', {
  baudRate: 9600,
  // issue가 있어서 그냥 따라 적었다.
  lock: false,
});


let openedFilePath;
const codeElm = document.getElementById('code');

// fileOpened라는 통로로 받을 것.
ipcRenderer.on('fileOpened', (event, {contents, filePath}) => {
    // 전역변수로 빼준다. why? saveFile에서 쓸 거라서.
    openedFilePath = filePath;
    codeElm.value = contents;
    // 파일 경로를 바꿔준다.
    document.getElementById('file-path').innerText = filePath;
});

ipcRenderer.on('saveFile', (event) => {
    // textarea의 값을 저장하려고 saveFile event가 오면 currentCodeValue에 저장해준다.
    const currentCodeValue = codeElm.value;
    fs.writeFileSync(openedFilePath, currentCodeValue, 'utf-8');
});

document.getElementById('sendBtn').addEventListener('click', () => {
  // sendBtn event가 click되면 textarea의 데이터를 string으로 변환시킨다.
  // why? string이 아니면 port.write에서 오류가 생긴다.
  const message = document.getElementById('code').value.toString();
  port.write(message);
});

// 나중에 활용 가능해서 남겨둠.
// async function listSerialPorts() {
//   await serialport.list().then((ports, err) => {
//     if(err) {
//       document.getElementById('error').textContent = err.message
//       return
//     } else {
//       document.getElementById('error').textContent = ''
//     }
//     console.log('ports', ports);

//     if (ports.length === 0) {
//       document.getElementById('error').textContent = 'No ports discovered'
//     }

//     tableHTML = tableify(ports)
//     document.getElementById('ports').innerHTML = tableHTML
//   })
// }

// setTimeout(function listPorts() {
//   listSerialPorts();
//   setTimeout(listPorts, 2000);
// }, 2000);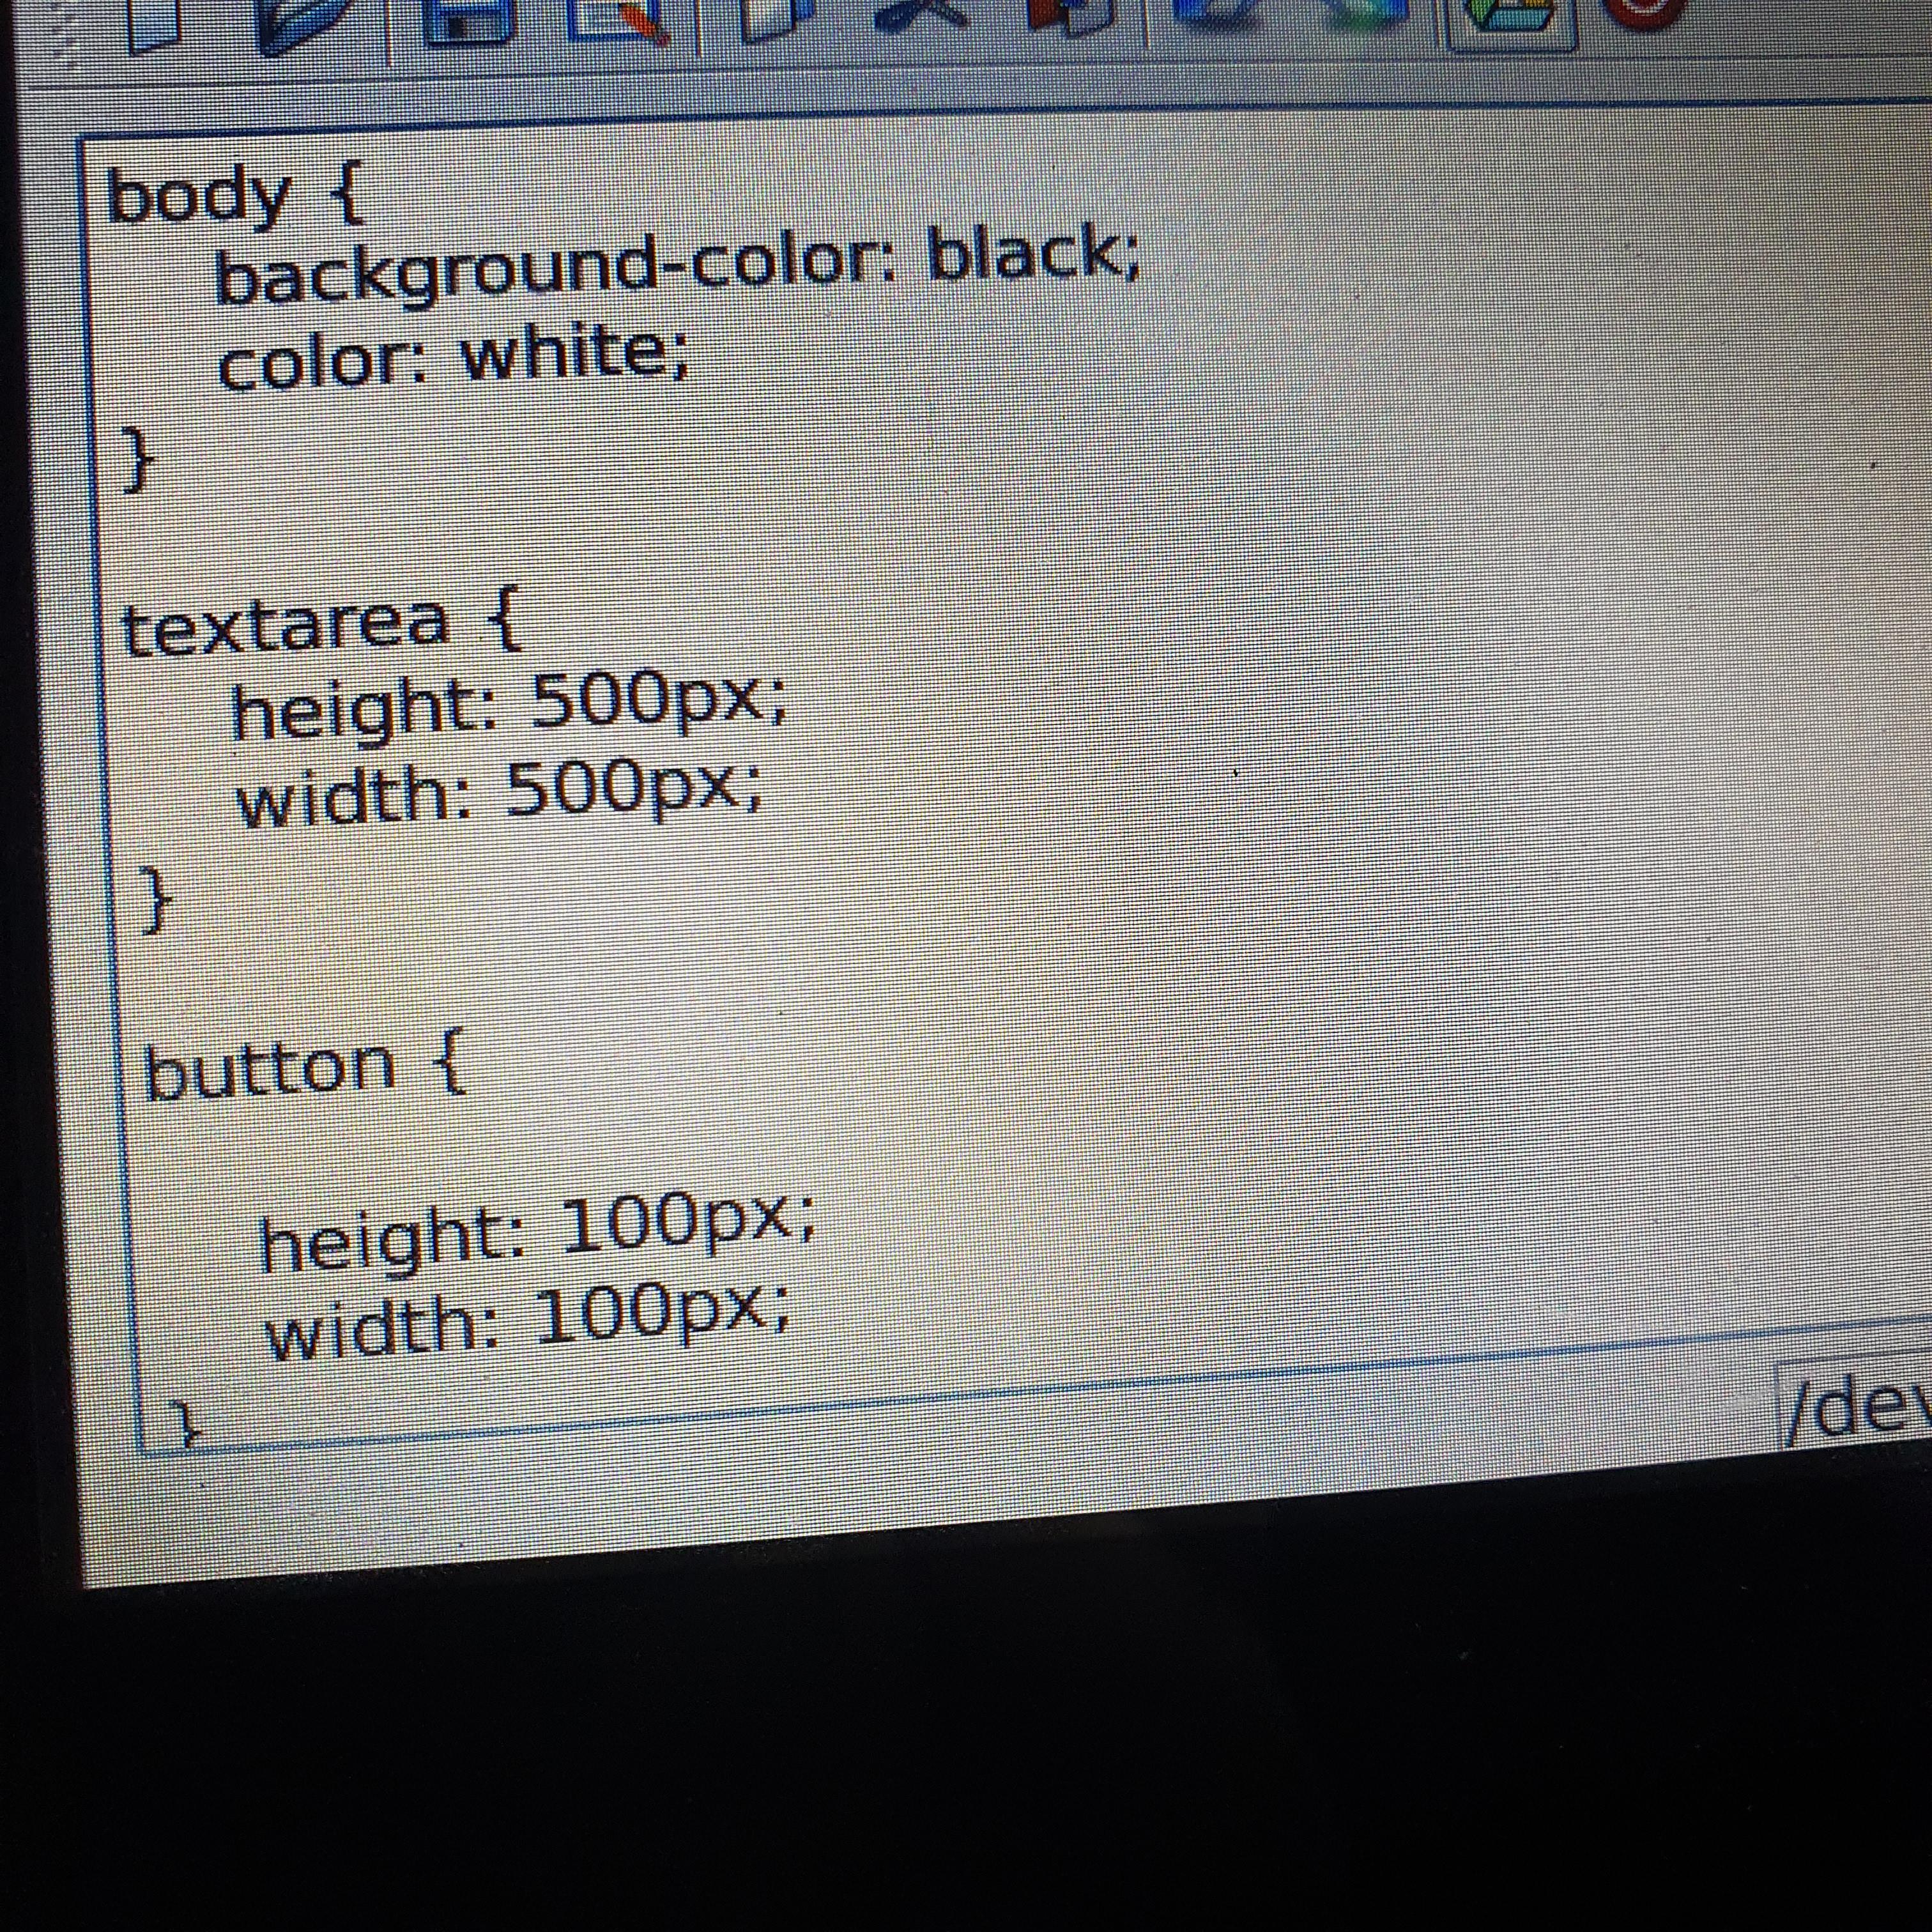
가지고 있는 serial 통신 기기에 잘 도착한 것을 볼 수 있다.
근데 이 기기에 한정된 건지 다른 것들도 그런지 모르겠지만,
한글은 보냈을 때 hex코드로 보내니 나중에 한글도 도전해봐야겠다.
UI적인 부분에서 업데이트할 부분도 많고 동적으로 port지정도 해줘야 하니
할 일이 산더미다.
특히 정해진 커리큘럼 없이 이렇게 구글링 해가며 배우는 방식은 진이 다 빠진다.
마지막으로 내가 참고한 고마운 자료들 링크 걸고 쉬러 가야겠다.
기존 버전의 serial 오류 관련
https://github.com/electron/electron/issues/18397
[Discussion] Requiring Native Modules in the Renderer Process to be NAPI or Context Aware · Issue #18397 · electron/electron
Native modules in Electron Loading native modules in Electron has always been tricky. It's a pain to rebuild, to link to the right node.lib/dll, and to ensure your NODE_MODULE_VERSION is correc...
github.com
https://developers.google.com/web/fundamentals/security/csp?hl=ko
콘텐츠 보안 정책 | Web | Google Developers
콘텐츠 보안 정책은 최신 브라우저에서 교차 사이트 스크립팅 공격의 위험과 영향을 현저히 줄일 수 있습니다.
developers.google.com
textarea 만들면서 참조한 잘생기고 코딩 잘하는 양남 형
https://www.youtube.com/watch?v=kTQmxm7UdjU
'Study & Project ✏️ > electron 🐣' 카테고리의 다른 글
| [라즈베리파이 크로스컴파일] electron을 이용한 앱 개발일지 (2) | 2022.01.18 |
|---|---|
| [라즈베리파이 크로스컴파일] 6. electron-builder를 통한 윈도우 -> 라즈베리파이 크로스컴파일 하기 (0) | 2022.01.17 |
| [라즈베리파이 크로스컴파일] 4. electron desktop file 예제 (0) | 2022.01.05 |
| [라즈베리파이 크로스컴파일] 3. electron keyboard shortcuts 예제 (0) | 2022.01.05 |
| [라즈베리파이 크로스컴파일] 2. electron darkmode 예제 (0) | 2022.01.03 |